Series Table of Contents
Part 1: SQL Executor Service Part 2: Dependency Injection Part 3: Extending Functionality
Previous Article
In a previous article, C# Tip: SQL Executor Service, I defined a pattern for SQL Script Execution that offers some flexibility in the way we can run queries and commands. It allowed us to inject a service, automatically create connections and transactions, and simplify SQL-related services. At the end of the article, I provided a bonus implementation that could allow you use the same transaction across multiple repository method calls.
However, what I did NOT cover is how to actually implement this "Scoped Transaction" within the .NET Core dependency injection system. This article will cover how you can actually use this in a practical way within an ASP.NET Core project. We'll show two approaches.
Let's get started!
Article Recap
As a quick recap, let's look at the interface again from the last article,
We provide a simple mechanism that can be injected across repositories and services that utilize SQL. We would want to use it in a similar way as the below example,
We use the executor instead of creating an SqlConnection each and every time. This also will allow us to share a transaction if multiple SQL Commands need to be run.
Transaction Accessor Service
Before we can utilize the executor, we have to create another service. This service will control the SQL Transaction itself.
This "Accessor" is used to create and access the transaction for other services. We have scoped the interface internal for a reason. We'll go over that a bit later.
Now for the primary implementation of the accessor,
The implemented Accessor will take an connectionString as its input and use this to create and open a SqlConnection. It will then create the SqlTransaction and assign it locally. If a transaction has already been created, an exception will be thrown.
Again, this service is internal only. We really want to make sure we control how this class is used since it isn't using "best practices" from a design perspective.
Note: We don't necessarily NEED to have the
ISqlTransactionAccessorinterface in this example. However, I always create an interface, in the off chance that I will want to decorate the implementation for debugging purposes. For instance, I may want aLoggedSqlTransactionAccessorthat will insert log entries when a transaction is created.
Access-Based SQL Executor
Next, we really need a different SQL Executor that will use our accessor,
As you can see, we simply use the accessor to pull the transaction and connection and send it into each command. It's not any more complicated than that.
But here again, we have the class set as internal.
Using the Resource Filter
Now that we have our services, we really need to start using it. We're going to utilize a Resource Filter that works with the MVC filter pipeline to create the transaction and commit it afterwards. Take a look at the picture below,
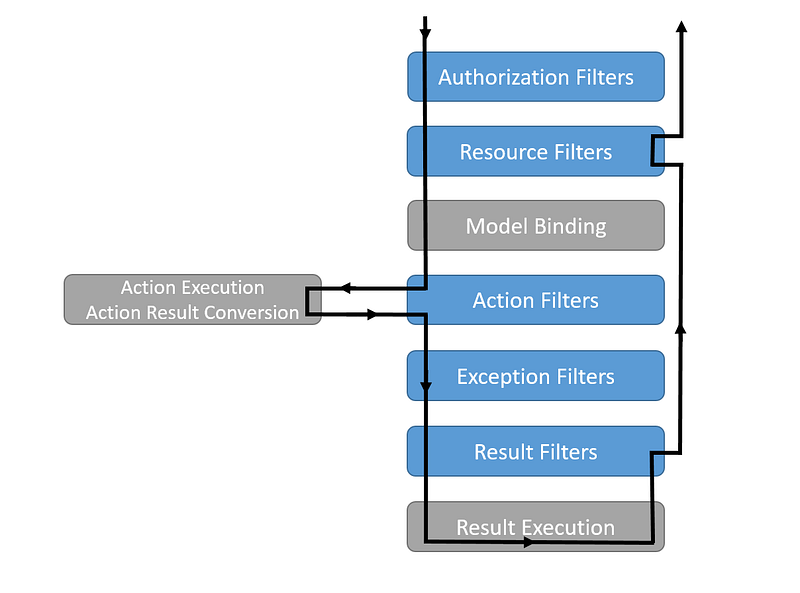
We chose to use a Resource Filter because it happens early in the pipeline. It is called on the way in AND out. This does present a bit of a limitation with this approach,
Any usage of
ISqlExecutorin an authorization filter, or outside the standard MVC filter pipeline will fail.
Let's show the filter implementation,
This filter takes in the ISqlTransactionAccessor the same as the ISqlExecutor. However, the difference is that the accessor's Create() method is called. This filter will start the transaction and ensure it is properly committed.
You'll notice that I check the response status code to make sure it is less than 400. Codes with 400 and above are considered errors in a typical system. So, we don't commit. This logic can be as simple or as complicated as you require.
Note: Rollback is not called in this method. If
Commit()orCommitAsync()is not called by the time of disposal of a transaction it is automatically rolled back. However, if you are not comfortable with this magic, please implement.
Again, this class is set to internal.
Applying the Filter with Dependency Injection
Each of these interfaces and implementations are set to internal.
Why?
First, we should be putting this kind of code in a library somewhere. It's best not to put it with your web project directly. This is reusable code. Might as well have it somewhere you can reuse it.
Secondly, we need to do very specific things when we are trying to use this SQL Executor. Requiring developers, unfamiliar with your code, to properly implement it is asking for trouble. Mistakes will be made.
So, we scope everything as internal except for the extensions the developers will need to add to their Startup.cs file,
As you'll notice, everything is scoped. We want to create a single transaction for every request that comes to our system. This ensures that all repository services are captured through the lifetime of the request.
This method is itself public. All of our necessary internal dependencies are defined here. At the end of the method, we are configuring the MvcOptions to include the filter on all Actions.
You could extend this a bit more to ensure Razor Pages and Views are also included, as necessary. I'll leave that to you as an exercise.
Finally, to use this extension, add it to your services, like so,
At this point, all you need is a connection string to pass into the method and you have access to ISqlExecutor in every action within your system. It will act like the old-school TransactionScope class. However, in this case, you do have a bit more access and control, while avoiding the Ambient Context Anti-Pattern.
Middleware Alternative
If you feel the need to use ISqlExecutor everywhere, then there is an alternative: Middleware.
We can use middleware to basically do what we did with the Resource Filter. However, it does come at a cost. It will create a transaction for ALL requests to the system that make it to that middleware. So, placement of the middleware is critical. If too early in the pipeline, you will create it for static files, swagger, or anything else. Too late, and you may miss a service that needs ISqlExecutor. Solving this problem can get complex and is beyond the scope of this article. But I'll give you the basis of the middleware approach.
Note: We can solve this problem directly in the Resource Filter and DI by implementing a more complex SQL Executor that will create a transaction on-the-fly if the transaction is null. This adds a bit more complexity but should be fairly trivial to accomplish. Just be sure to add some tests.
Let's create the middleware class,
This is almost an exact copy of the Resource Filter implementation. As you can see it is internal.
Next, we need the extensions to utilize these internal classes,
The main difference here is that we don't have the filter anymore and now we have a UseMiddleware call on the application builder.
And its usage looks like the following,
The only major difference between this implementation and the last (with the Resource Filter) is the placement of the UseSqlExecutor() extension call.
Conclusion and Sign-Off
In this article, we went through adding ISqlExecutor to our dependency injection system in a way that allows us to make multiple calls within a single transaction. As long as the calls are within a single action, the transaction will work as expected,
Each of these calls will end up in the same transaction. This will help you keep consistency in the system when a failure does occur within a call to the backend.
Hope this has helped you to utilize the ISqlExecutor to its full potential!
Please be aware, that this code is NOT production ready. This is a stripped-down version of the code to help showcase the main technique. However, exception handling, logging, and other concerns are a necessity.
Until next time!